Skip to Main Content

Archmere Academy Library: NOODLETOOLS for STUDENTS

Serving the Archmere Academy Community

Login

NoodleTools Quick Guide for Students 

This guide covers the following topics:

1. How to create a new account

2. How to start a new project and a source list

3. How to create notecards

4. How to share a project with your teacher

5. How to set up a project collaboration with your classmates.

NoodleTools

How to Access NoodleTools Through Google (G Suite)

Archmere Academy has enabled access to NoodleTools through G Suite, so you can register and access NoodleTools without the need to remember a separate personal username and password.
 

1. Accessing the installed app


Log in to NoodleTools through the button found within the G Suite Universal Navigation Bar as pictured below. Note that the app button does not appear in the menu found under the Google home/search page (at www.google.com). You need to be in another Google App, like Gmail or Google Drive.


Alternatively, you can enter your ARCHMERE Google email address under the "Access via G Suite / Office 365" area of the main login screen (on the right side), then click the "Sign In with Google" button below that.


If you are using an iPad or other mobile device, the Google app menu will not display the NoodleTools app. Thus, you will log in by entering your Google email on the main login screen).


2. Logging into NoodleTools

Clicking on the NoodleTools app in the Universal Navigation Bar or entering your Google email on the main login screen (under "Access via G Suite") initiates the login process. You may be prompted to select your G Suite account if you aren't already logged in, or you are logged in to multiple accounts. 


If this is not your first time logging in this way, you will be automatically logged in and see your My Projects screen. 

If this is your first time logging in this way, go to 3. Account setup below to create a new account or link an existing account to your Google ID.

How to Share Your Project with a Teacher

Your teacher may ask you to share your project, which gives them the ability to look at your progress and send you feedback. 

1. On the Dashboard screen of the project you want to share, under Sharing, click "Share with a project inbox" to open the area.

Share a project with a teacher's inbox

2. In the Project inbox field enter the inbox’s name. The name will auto-complete as you begin to type, and once you see the right one, select it from the list.


3. Your name will be automatically filled in, but if you have not entered your full name in your profile, enter it here, so your teacher will know who you are (he or she may not recognize your personal ID).

4. If you have a paper to share with the teacher, check the box "Share linked Google Doc."
5. Click Done. The project is now shared with the inbox "Environmental Activism," and the paper is also shared with the inbox.

Class inbox

If the teacher cannot see your paper, click "Reshare" to re-link the paper with the inbox. 

On the Projects screen, the project you shared will have a checkmark in the Shared column. if you do not see the checkmark, reload the Projects screen. 

Projects shared screen

When a teacher views your shared project and leaves new comments for you, you will find them in the comments panel under Projects, Sources, or Notecards. The comment icon in the upper right of your screen will display the number of new comments. Click on the icon to open the comments panel.

Comment icon on sharing screen

Open any of the categories in the comments panel to view the new comments. If your teacher has made a comment about a particular source or notecard, click View source or View notecards under the comment and NoodleTools will display the item referred in the teacher’s comment.Teacher comment

You can identify which teacher has left you a comment by looking at the ID preceding the comment (e.g. “mstandersen” in the above screenshot).

You can respond to the teacher’s comment by clicking Respond.

How to Set Up a Collaborative Project with Your Classmates

In NoodleTools, you can work together with your classmates on a project. You will be able to share source references, notecards, the outline, and the Google Doc Word Online linked to the project. You can also exchange comments or questions about the project.

How to Add a Collaborator to Your Project

1. On the Dashboard screen, in the Sharing and Collaboration sectionunder Student Collaboration, to add a new collaborator to the project, click Add students.

2. Enter the student’s Personal ID in the text field. By default, the student will be a Full collaborator (equal access to edit the project as yourself). If you want the student be able to view your project and add comments, but not be able to add or change anything else, select the Peer-reviewer option.
 
If you need to add more than one collaborator, click Add More and enter the Personal IDs for each one. When you are done adding collaborators, click DoneClick to reload the Dashboard screen. You will now be able to see all collaborators' contributions to the project.  

3. If you have a Google Doc or Word Online linked to the project to share, click Share paper in the Paper column. You will be prompted to log into your Google or Office 365 account and then the document will open. Return to the Dashboard screen and reload the page to verify the Paper column indicates that the document is shared with the collaborator. 


If in the Paper column, it displays "No Google ID" or "No Office 365 ID," ask the collaborator to add their ID to their profile under "My account."


How to Locate and Open a Collaborative Project


A collaborative project shows up like any other project that you created on your My Projects screen, but you will see a checkmark in the Collaborating? column. 


Collaborative projects can be shared with a teacher’s project inbox just like any other project, so there can potentially be checkmarks in both the Shared? and Collaborating? columns. 
 
When sharing a collaborative project with a teacher, only one of the students working on this collaborative project needs to share the project with the teacher's inbox (as opposed to each collaborator individually).
 

How to Work on a Collaborative Project


How to determine what team members are currently working on the project

As you work together on a collaborative project, your team members will use their NoodleTools accounts to contribute work or make changes to the project. When another student has the project open, you will see “Who's online” below the top navigation. Click on the link to view who is working on the project. If “Who's online” is not visible, it means that you are the only one currently viewing the project.


How to know when a team member has made a change

When a team member has saved a change (e.g., edited a notecard, deleted a source reference, updated the outline, etc.), other team members will get a green notification at the top of the screen reflecting what has changed.

Notecards — On the Notecards screen, when the green notification appears (see above image), the title of the modified notecard on the Tabletop will also blink.

As team members make changes to the project, your own screen will update to reflect those changes. On the Notecards screen, the changes on your screen will occur in real-time. For example, as a collaborator moves notecards around on the Tabletop, or into piles, you will see those same changes immediately on your Tabletop.

Sources — On the Sources screen, like with notecards, a green notification at the top will alert you when a teammate made a change. To view their changes, reload the screen.
 

How to Find Out What Changes Were Made to the Project


If you were not logged in when changes were made to the project, you can view updates in the Project history log on the Dashboard screen. Under Project and History, click “30-day log of work done on this project.” The Project history log shows the most recent activity at top. Scroll down to see what actions and changes took place earlier.


How to Add or Respond to a Comment or Question About the Project


See “
How to write and respond to project comments (the basics).”


How to Delete or Recover a Deleted Project


If you are a collaborator on a project, selecting the project and deleting it from your Projects screen simply removes you as a collaborator. The project will still remain visible to your team members.


If you accidentally delete a collaborative project from your folder, you will need to ask one of your team members who still has access to re-add you as a collaborator to the project.

Source References

How to Create a Source Reference


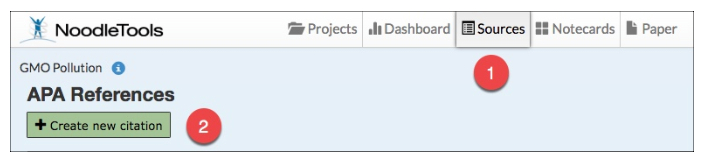
1. Click Sources in the navigation bar at the top of the screen to begin adding references to a new project. 

2.  Click Create new citation.

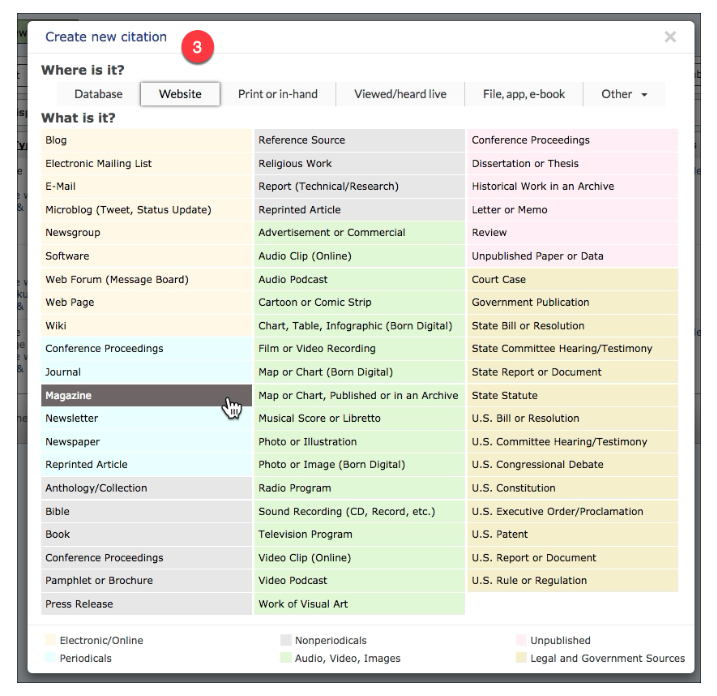
3. When you create a new citation, you will be prompted to select where the source is and what type it is. The content of the list will vary depending on what project level you selected. The example shown below is using the Advanced level. 

Creating a new citation

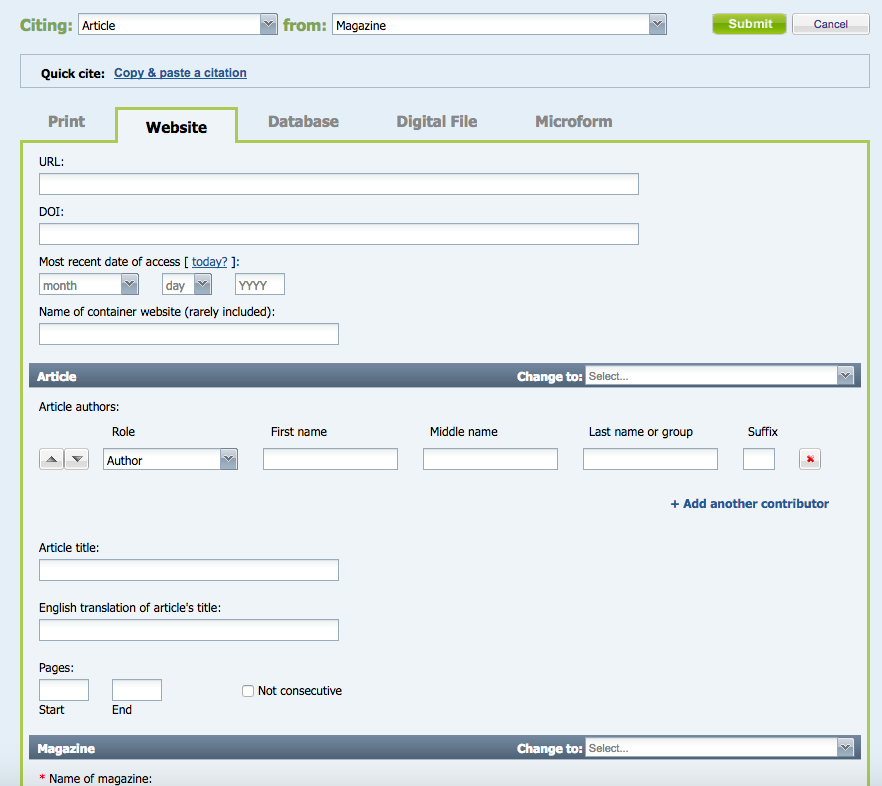
Once you select what the source is, a new citation form will appear in the next screen. 

Note: If you have selected in your profile to display "Show Me" help screens when available, a help screen will appear first.

  • Show Me is an online tutorial to demonstrate how to evaluate the source.
  • Source Check lists other related forms that may fit your source.
  • If you are comfortable citing a particular type of source and wish to hide this additional help, check the “Hide this help screen next time” box at the bottom of the page.


The form that you will complete to cite a source is dynamic and shows you only the fields that apply to your specific source. Those fields change based on the style (MLA, APA, or Chicago), level (Starter, Junior or Advanced), source type, content type, and publication medium selected. 

5. A Guide at the top-right of the screen displays a formatting template. Click the blue tab (MLA Guide in the screenshot below) to open the guide. As you enter information in the form, the corresponding element is highlighted in the template.
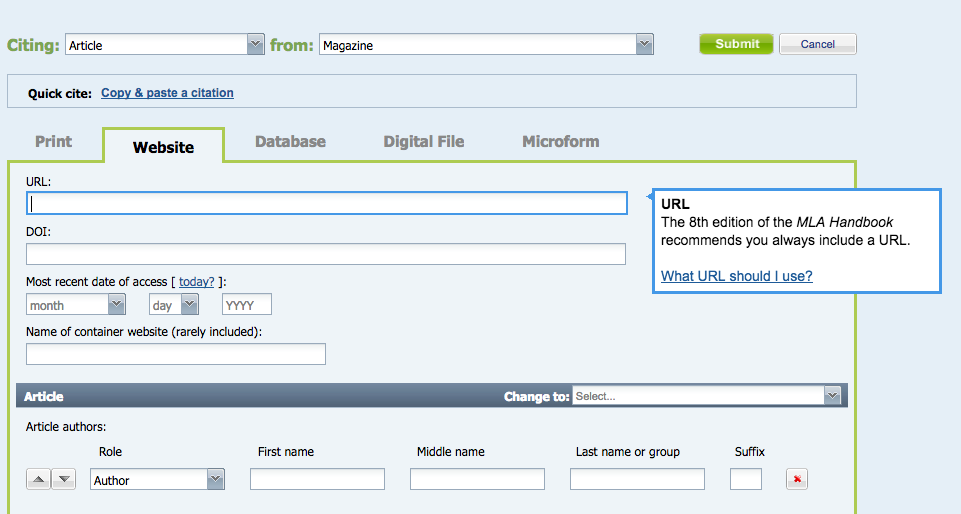
4. On the form, fill in as many details about your source as possible. Help text pops up with tips as you move from field to field.


6. On the form, any field that has a red * is required. If the field has no data, you will not be able to submit the form. Note that other fields are also necessary to create the reference properly, but there are cases when those non-starred fields might need to be left empty.
7. As you type into a field, NoodleTools automatically checks for common errors with capitalization, abbreviations, and more. When a yellow warning triangle appears to the right of a field, mouse-over the triangle to view suggestions for how to correct the potential problem.

Check for errors

8. An Annotation field at the bottom of every form allows you to create an annotated bibliography (you can later choose to include or exclude the annotations from your exported source list via the Print Formatting option).

Annotation field

9. Below the Annotation field, the checkbox next to Include this source in my final bibliography (checked by default) allows you to add a source to your working bibliography but then omit it from your final exported version. The traffic light image (red, yellow, or green) next to the checkbox will indicate whether or not a particular source is typically included for the citation style you are using.For example, a well-known reference book is not usually included in a Chicago-style bibliography (but would be in MLA or APA source lists).

10. Submit the form to add your reference to your source list.

11. If there are multiple references in your source list, a link Jump to citation I just edited at the top of your bibliography takes you to the one you just added (which will also be highlighted in your list).

12. Repeat all steps above for each source you wish to cite.

How to Edit a Source Reference


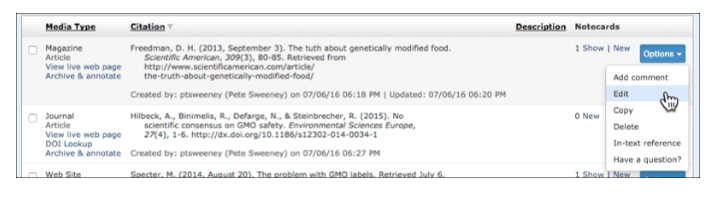
1. Find the source reference you wish to edit and select Edit on the Options menu.

Selecting a reference to edit
2. Modify the information about your source. You can either:

  • Correct individual fields,
  • Use the dropdown list(s) at the top of the form to change the source or content types (e.g., Journal instead of Magazine or Editorial instead of Article), or
  • Modify the publication medium if necessary by selecting a different tab at the top of the form (e.g., Web Site instead of Print).

3. Check for any new data required if you have updated the publication medium or source/content type.
4. Click Submit.
5. If there are multiple references in your source list, a link Jump to citation I just edited at the top of your bibliography takes you to the one you just added (which will also be highlighted in your list).

How to Delete and Undelete a Source Reference

Deleting a reference from your source list:

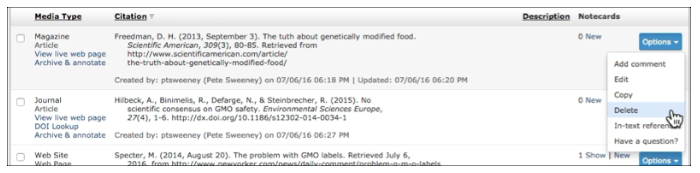
  1. Find the entry you wish to remove and select Delete on the Options menu.
  2. Click OK when asked Are you sure you want to delete this entry?

Deleting a reference

Deleting multiple references at once:

  1. Mark the checkboxes on the left to the references you wish to delete.
  2. Scroll down to the bottom of the screen and click Delete.
  3. Click OK when asked Are you sure you wish to delete all of the entries that are selected above?

Undeleting references:

  1. Click Undelete at the top of the screen.
  2. Restore deleted citations window will appear that allows you mark checkboxes next to the items you wish to recover.
  3. Click Undelete.

 NOTE: Notecards become unlinked from a source when the reference is deleted (they become “thought cards”). If you restore a reference, you will need to relink its notecards (either by editing each notecard and selecting the right item from the Source menu or by selecting multiple notecards on the Notecard Tabletop and clicking Link to source to relink all of them).

Notecards

How to Create Notecards

Once you create and open a new project in NoodleTools, there are two ways to create and access your notecards: the Notecards and Sources screens. Since you can view and edit all of your notecards in either screen, you’ll find that you develop a preference for working in either the Notecards or Sources screen as you take notes.

How to create a new notecard

If a notecard is created from the Sources screen, it is automatically associated with a particular source. A “thought card” (a notecard that contains your own thoughts or a reminder to yourself, not tied to any reference in your source list) can only be created from the Notecards screen.

1. On the Notecards screen, click +New above the Notecard Tabletop.

New Notecard in the Sources screen

Alternatively, on the Sources screen, click “New” in the Notecards column next to a reference.

New notecard for an existing source

2. A new notecard opens for editing.

Edit screen for new notecard


3. In the Title field, choose a short description (1-3 words) that represent the main idea of the notecard. You might choose to wait and decide on a good title for the notecard once you’ve filled in the notecard content, like your paraphrase or summary.
4. Select the source from the Source dropdown list and specify the URL and page numbers if any in the fields to the right.
5. Copy and paste the source material into the Direct quotation field ("Copy, paste and annotate here").


Some helpful hints:

  • Copying the original material will assure that you will always be able to reread or review the author’s words and logic even after you have returned a book or closed a webpage.
  • Aim to put one idea into each notecard (as opposed to just copying an entire article into the field).
  • Images and videos on the Web can be embedded in your notecard within this field.
  • Take the time to reread and mark up the author’s words with text colors and highlighting; the better you understand the quote, the easier it will be to paraphrase or summarize the author’s idea in the “Paraphrase or summary” field. 
  • In the Paraphrase or Summary field ("In your own words"), your instructor may provide specific directions for what is required in terms of paraphrasing or summarizing the material you collect. Then record your thoughts, feelings, and ideas for following up with additional research in the My Ideas field ("Original thinking here"). These are the responses that help you develop a personal perspective. 
  • For hints about paraphrasing, summarizing, or recording your own ideas, click the ? next to each of the fields to see additional prompts for what to include.

6. Add new tags or select previously added tags from My tags in the field to the right.
7. When you edit a notecard, your changes are automatically saved. To revert to an earlier version, click "Manage versions." A new window will display the current version and previously saved versions. To select an earlier version, click the date and time of the version to revert the notecard to that version saved. To return to your notecard, click "Manage versions." 
8. Click Save and Close to close the notecard. 

On the Notecards screen, the new notecard appears in the upper left corner of your tabletop view. On the Sources screen, you can show or hide notecards for a particular reference by clicking “Show” or “Hide” in the Notecards column.

New notecard on tabletop

How to Edit Notecards

1. On the Notecard Tabletop view, hover over a notecard (or long-press a notecard on an iPad) and click Edit.

Editing a notecard

On the Notecard Detail view, click Edit at the lower right corner of any notecard in the middle panel.

Detail of notecard edit screen

On the Sources screen, in the Notecard column, click “Show” to view the notecard, then select Edit on the notecard's Options menu. 

Editing a notecard in the Sources screen

2. When you finish editing the notecard, click Save to save your changes and close the window.